Dev Environment Setup
There are several ways to setup a local development environment for Kubernetes. The three most common ones are Minikube (docs), Docker Desktop and Kind (docs). Minikube provisions a local Kubernetes cluster on several Virtual Machines (via VirtualBox or something similar).
Docker Desktop, on the other hand, sets up Kubernetes cluster using a local Docker installation.
Kind provides lightweight Kubernetes clusters for Windows, Linux and Mac using an existing Docker installation.
Local Kubernetes cluster using Docker Desktop
In this tutorial, we will base all the installs on Docker Desktop. Even in this case we can use a lightweight minikube setup which gives the same functionality with less impact.
Installation
Download and install Docker Desktop. Newer Docker versions have an embedded version of Kubernetes so no additional installation is needed. Follow the instructions here to get Kubernetes up and running within Docker Desktop. Alternatively, a Kind cluster may be created (see instructions here.
Once Kubernetes is started in Docker Desktop, you should see something similar to this:
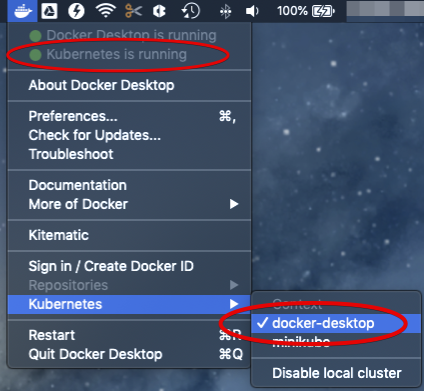
This means that:
- Kubernetes is running.
- The command line tool
kubectlis installed in the/usr/local/bindirectory. - The Kubernetes context is set to
docker-desktop.
Deploy and access dashboard
Optionally, after setting up Kubernetes you may wish to deploy the Kubernetes Dashboard Web UI. The dashboard may be deployed using the following steps:
- Follow the instructions here to deploy the dashboard.
- Use port-forwarding to access the dashboard on the local host:
kubectl -n kubernetes-dashboard port-forward svc/kubernetes-dashboard-kong-proxy 8443:443 - Access the dashboard here.
Access local Kubernetes cluster
The dashboard as deployed in the previous step requires a token to sign in.
- Generate token instructions can be found here
- Copy the token.
- Paste the token value into the input box and sign in:

Local Kubernetes cluster with Minikube
Minikube can be added to an existing Docker Desktop install. Minikube can either use the pre-installed hypervisor or use a hypervisor of your choice. These instructions use HyperKit which is embedded in Docker Desktop.
If you want to use a different hypervisor then HyperKit make sure that you follow the generic minikube install instructions. Do not forget to install the correct driver for the chosen hypervisor if required. The minikube installation instructions can be found here.
Docker Desktop should have already installed HyperKit. To verify this, open a
terminal and run: hyperkit. Any response other than
hyperkit: command not found confirms that HyperKit is installed and on
the path. If it is not found you can choose a different hypervisor or
fix the Docker Desktop install.
Installing Minikube
- Install minikube, either via
brewor directly via these steps:curl -Lo minikube https://storage.googleapis.com/minikube/releases/latest/minikube-darwin-amd64
chmod +x minikube
sudo mv minikube /usr/local/bin - Install HyperKit driver (required). You can either use
brewor directly via these steps:curl -LO https://storage.googleapis.com/minikube/releases/latest/docker-machine-driver-hyperkit
sudo install -o root -g wheel -m 4755 docker-machine-driver-hyperkit /usr/local/bin/ - Update the minikube configuration to default to using HyperKit:
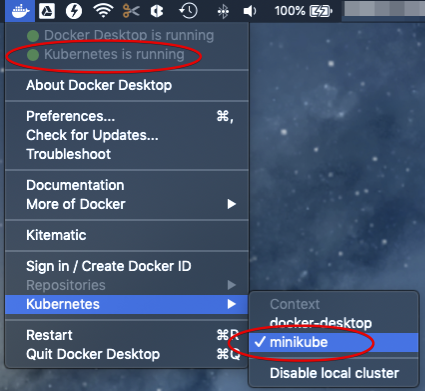
minikube config set vm-driver hyperkit - Change Docker Desktop to use minikube for Kubernetes:
Deploy and access the cluster
After the installation is done you can start a new cluster.
- Start the minikube cluster:
minikube start --kubernetes-version v1.24.7 - Start the minikube dashboard:
minikube dashboard &
Build impact
When you create images make sure that the build is run after pointing it to the correct cluster. Without setting the environment minikube might not find the docker images when deploying the scheduler.
- Make sure minikube is started.
- In the terminal where you will run the build, execute:
eval $(minikube docker-env) - Run the image build from the yunikorn-k8shim repository root:
make image - Deploy the scheduler as per the normal instructions.
Local Kubernetes Cluster with Kind
Kind (Kubernetes in Docker) is a lightweight tool for running lightweight Kubernetes environments. It is very easy to test different Kubernetes versions with Kind by specifing the version during cluster setup.
Installation
If you have go installed, you can run:
go install sigs.k8s.io/kind@latest
Other installation methods can be found on the Kind website.
Kind version 0.15 is required for Kubernetes 1.25 or later. Later versions of Kind add Kubernetes 1.26, 1.27 and 1.28. Check the Kind release notes for the specific Kubernetes releases supported.
Using Kind
To test a new version of Kubernetes, you can pull a corresponding image from kind's repository.
For example, to create a cluster running Kubernetes 1.26.6:
kind create cluster --name test --image kindest/node:v1.26.6
Kind will download the appropriate image and launch a new cluster named
test. The active Kubernetes cluster will also be changed to test.
To delete the kind cluster:
kind delete cluster --name test
Loading your images
In order to use a local image, you have to load your images into kind's
registry. If you run make image, you could use the following command
to load your kind image. This assumes AMD64 architecture.
The scheduler, web-ui and admission-controller examples are below:
kind load docker-image apache/yunikorn:scheduler-amd64-latest
kind load docker-image apache/yunikorn:web-amd64-latest
kind load docker-image apache/yunikorn:admission-amd64-latest
If running on an ARM system, replace amd64 with arm64 above.
Debug code locally
The scheduler may be run locally for debugging. This example assumes you have installed the GoLand IDE for development.
In GoLand, open the yunikorn-k8shim project. Then click "Run" ->
"Debug..." -> "Edit Configuration..." to get the pop-up configuration
window. Note, you need to click "+" to create a new profile if the Go Build
option is not available at the first time.
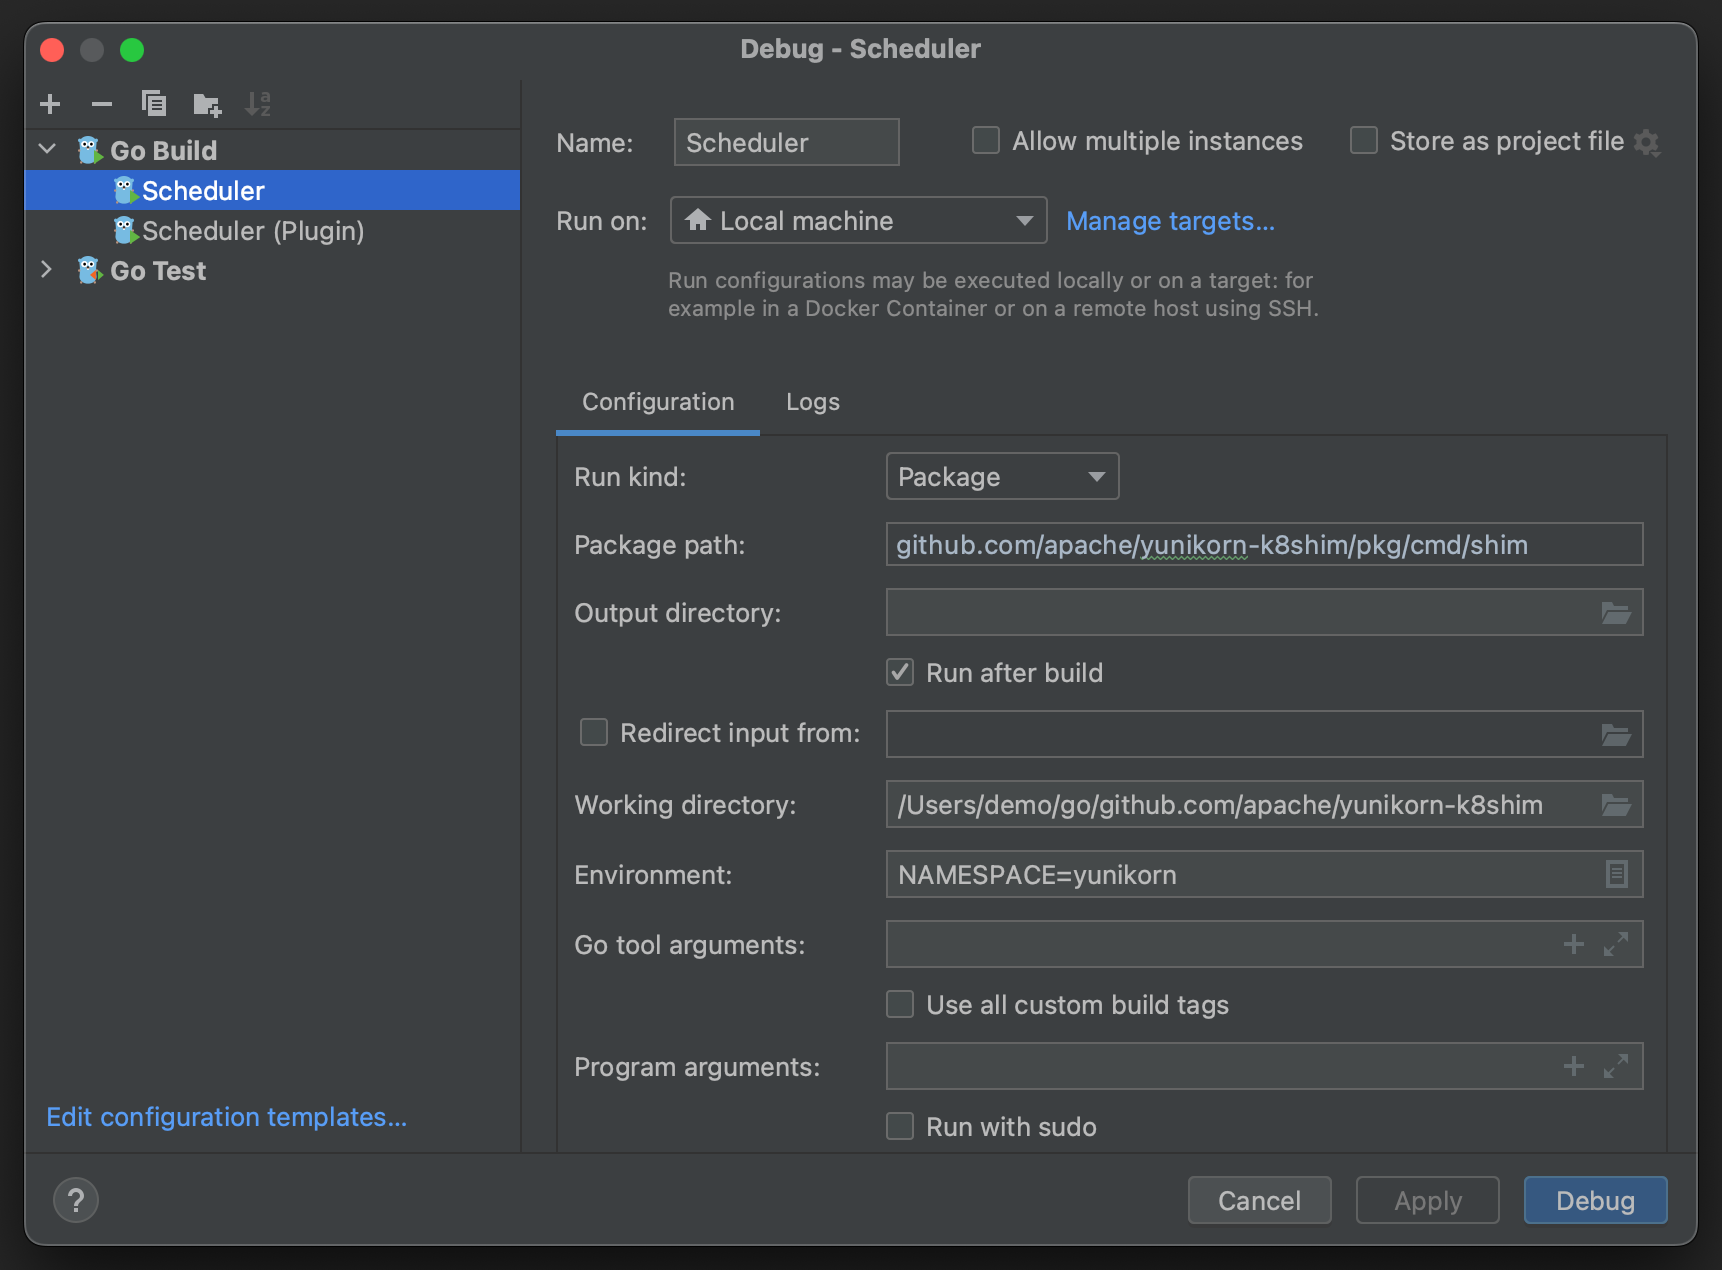
Set the following values in the dialog (as shown):
- Run Kind: Package
- Package path:
github.com/apache/yunikorn-k8shim/pkg/cmd/shim - Working directory: Project base directory (
yunikorn-k8shim) - Program arguments: Empty
- Environment: If
KUBECONFIGis not set globally, ensure it is set here. Additionally, you may want to setNAMESPACE=yunikorn, as otherwise YuniKorn will look for theyunikorn-configsConfigMap under thedefaultKubernetes namespace.
Once the changes are done, click "Apply", then "Debug". You will need to set proper breakpoints in order to debug the program.
Debug the scheduler plugin
The scheduler may also be run in plugin mode. In this mode, the YuniKorn scheduler is built on top of the default scheduler and runs as a plugin (rather than completely standalone). Functionally, it performs the same tasks, but relies on the upstream Kubernetes scheduler codebase for common functionality.
The run configuration for the scheduler in plugin mode is as follows:
- Run Kind: Package
- Package path:
github.com/apache/yunikorn-k8shim/pkg/cmd/schedulerplugin - Working directory: Project base directory (
yunikorn-k8shim) - Program arguments:
--bind-address=0.0.0.0
--leader-elect=false
--config=conf/scheduler-config-local.yaml
-v=2 - Environment: If
KUBECONFIGis not set globally, ensure it is set here. Additionally, you may want to setNAMESPACE=yunikorn, as otherwise YuniKorn will look for theyunikorn-configsConfigMap under thedefaultKubernetes namespace.
Additionally, before running for the first time, run make init from a
terminal in the root of the yunikorn-k8shim repository. This will
generate the contents of conf/scheduler-config-local.yaml, which is
required.
Access remote Kubernetes cluster
This setup assumes you have already installed a remote Kubernetes cluster. For a generic view on how to access a multiple cluster and integrate it follow the accessing multiple clusters documentation from Kubernetes.
Or follow these simplified steps:
- Get the Kubernetes
configfile from remote cluster, copy it to the local machine and give it a unique name i.e.config-remote - Save the
KUBECONFIGenvironment variable (if set)export KUBECONFIG_SAVED=$KUBECONFIG - Add the new file to the environment variable
export KUBECONFIG=$KUBECONFIG:config-remote - Run the command
kubectl config viewto check that both configs can be accessed - Switch context using
kubectl config use-context remote-cluster - Confirm that the current context is now switched to the remote cluster config:
kubectl config get-contexts
CURRENT NAME           CLUSTER                AUTHINFO
        docker-desktop docker-desktop-cluster docker-for-desktop
*       remote-cluster kubernetes             kubernetes-admin
More documentation can be found here.